Pages

Wednesday, February 29, 2012

Balboa Park Parisian Photos


A few years back I vacationed in Paris. What a treat. Anyone that has been there, you know it is just as mesmerizing as photos we see and watch on television. I recently watched the movie, "Midnight in Paris" with Owen Wilson, which is set in Paris. Great movie, by the way... anyways, that is what got me browsing for images on the web that would enchant me as if I were there. I came across a book called "My French Life" by Vicki Archer. I have not yet seen the book, but it is about the author and her family who move to France and buy a 17 century farmhouse and property to restore. She shares lots of photos and their experience of their life there.  What intrigued me was this cliche cover in black and white:


So what, you say. The funny thing was, I was at Balboa Park just after it finished raining, taking photographs, and the a lady from the book cover walked right by me.  See, here she is:


My daughter posing as well:


Ok, it really wasn't the same lady from the book, but she made a neat photo!

Merci for looking!!!!


Wednesday, February 22, 2012

Glass Herb Vase


 All the glass jars that we buy filled once with jelly, pickles, salsa, make great vases. I keep a small collection of different sizes and shapes, which come in handy for fresh herbs and flowers. 


The annoying thing is the sticky label that is difficult on many to take off. To get the label off, I either soak them in hot water or run them through the dishwasher, then peel. Goof Off and a rag helps remove the adhesive too.

Well, sometimes I just want a little instant gratification. With a paper bag, scissors/xacto knife, glue, and a sharpie, I just cover the label.


All there is to do is cut strips from the paper bag to fit around the jar. Leave a little extra length to glue it to the other end of the strip.


For herbs, you can make your own label using a handy dandy sharpie (the cilantro one I used a rubber stamp flower).


Now I have herbs in the kitchen at my fingertips,
 and it looks pretty too!


Monday, February 20, 2012

T-shirt bracelets


My niece, Alysia, who is nine, came over this weekend to hang out for a while. I thought I would show her how to make some easy t-shirt bracelets she could make for herself and her friends. 
There are a lot of variations on these bracelets, but this is super easy if you know how to braid.
All you need is some old clean t-shirts, scissors, and a safety pin. If you want to add embellishments, like flowers, you would also need needle and thread, and whatever you want to add, like felt for the flowers.  First we cut three strips of t-shirt about a foot in length each. Alysia used two red strips and one brown strip.


Next, we made little holes or slits on one end of each of the strips to thread the other ends through for when we finished braiding. Then, we used a safety pin to pin the holey end to our sneakers. We braided like we would our hair.


The end of the braids was then threaded through the holes we made, and then into a knot.  We tried it out by putting it on her wrist then doubled it up.


Here's the cute model:


Alysia wanted to add something else, so we cut out felt flowers, and sewed them on with needle and thread. We made the center of the flower with thread as we attached it to the bracelet.


Ta da!!!


Friday, February 17, 2012

Table setting


A couple of weeks ago, I stopped at a garage sale and found this square, red paisley tablecloth, made in France. It was only 2 bucks.  I had arrived later in the morning and was wondering why no one had yet snatched it up. Hmmmm. I don't know. Anyways, the colors are bright and saturated and the size fits my table in the nook in my kitchen. Take a look:


I thought it was a great find.
Now all I need is some ratatouille.


Monday, February 13, 2012

Ladybug Thumb Stamp Scratch Paper


Many years ago, my cousin gave me a stationary gift. It was handmade by her, with little red and blue bugs in the corner. It was simple and adorable, and I did use the stationary to write a few letters before computers were used for everything. It is such an easy idea, I wanted to try it, So, you know those real estate notepad the realtors throw on your doorstep? We get so many of them, and I cant write that many notes anyway, I thought I would up-cycle them into cute ladybug scratch paper. Here's what I did.


I cut the ads off the notepad with and xacto knife .


Then I used a red stamp pad and my thumb for the body of the ladybug.


Then with a sharpie, I drew the spots and antennae. 


Easy as pie!
Actually pie is not that easy, but these are!


Saturday, February 11, 2012

Strawberry Pin Cushions


gt_mothers09_l.jpg
sorry for the missing picture, you can find it here

Martha, Martha, Martha! These are so cute.
As an amateur to sewing, looking for something easy and useful to sew, I found Martha Stewart's cute strawberry pincushions on her website and just had to make one. I would say it is pretty easy if you can use needle and thread. Martha suggests using a sewing machine but I just hand stitched it. And, I have to say I use it all the time.

 Here's the one I made, less the "seeds":


If you'd like to make one, or five (these would make a great gift for your sewing friend), Martha has a great tutorial here.

Have fun!

Friday, February 10, 2012

Easy Valentine's Day card


Valentine's Day is just a few days away so I thought it would be a good time to make a card for my Valentine. Sifting through my bins I pulled out by box of rubber stamps, scissors, glue,some paper and an old dictionary.


I thought it might be neat to find some words in the dictionary relating to Valentine's Day and use it for the card.
The page with LOVE was already torn out, soooo, I used ROMANTIC.
I trimmed the edges of the page using decorative scissors.

With a larger heart stamp, a little heart stamp and alphabet text letters, I did a few quick stamps on the card. I then glued the card to the dictionary page, and then glued it on a piece of cardboard for stability.


ROMANTIC is up in the right hand corner. Other words you could use could be flowers, heart, valentine, chocolate, sweet, or kiss, or?


The rubber stamps I bought a bulk of 64pcs at a thrift store for $16, the little text letters were 25 cents for the set, and the dictionary for 50 cents!!!


Tuesday, February 7, 2012

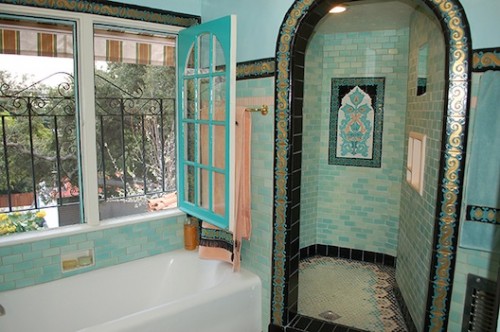
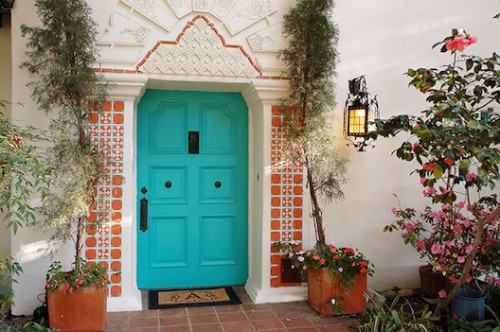
1920's Spanish Home

Living in California all my life, I have come to enjoy the styles of homes that were built around a century ago. Browsing the web for architectural eye candy, I stumbled upon one of my favorite California style of home, the 1920's Spanish Colonial. There are many versions of this style, depending on the architect and area. This one is is considered Spanish-Moorish and is located in Alta Dena, California. The photos and info from the article here, say it is known as Casa Andalusia. Andalusia is a territory in southern Spain.


Isn't it gorgeous??? Scroll down for more photos...

.

Fabulous entry door:


Colorful tile stair risers:


Kitchen:


Bath:


Patio:


Well, guess what? It's for sale!
$1.545 MILLION!!!!
Not so thrifty. But it's free to look!!


Sunday, February 5, 2012

Decorative Felt Flowers


I like doing crafts that I can pull out a box of supplies and make something useful and pretty in a short amount of time. I browsed the internet for something I could do with my stash of felt. I stopped at the Purl Bee, who has lots of cool ideas, and decided I really liked the felt flower charms that she made and the colors she chose. She also has a great tutorial and photos of various felt flowers that you can find here:  http://www.purlbee.com/felt-flower-charms/.  

I picked three colors that I liked together and stacked them,


then, just eyeballed the shape and cut the flower. I also pulled out some decorative flower buttons (found for $2 for a bag at a garage sale) for the center of the flower. 

Then with some needle and thread, I was finished in about 5 minutes.

I added it to a plain pillow.


The Purl Bee had lots of great ideas to use these for such as barrettes, a garland, or make a whole bunch of these and put them in a glass container for display. 
I'm going to do that one next!


09 10 Code line 7 9 is for loading jQuery library. Remove this line if you’ve already loaded it somewhere else in your blog. Hint: If your blog has an image slider, carousel or something with fading effect running, chances are it is powered by jQuery. If this widget doesn’t work, the first thing you want to do is comment out or remove this line. To use your own button, replace the URL in line 3 with the direct link URL to the image. Make sure to keep the quotes. To reposition the button, replace